Ditch the Deep Fryer: Crispy, Low-Fat Baked Chicken
The irresistible aroma, the satisfying crunch, the tender, juicy meat – fried chicken is a universal comfort food. Yet, the thought of dragging out the deep fryer, dealing with splattering oil, and the sheer volume of fat that comes with it often makes us pause. What if you could achieve that same glorious crispiness and rich flavor, but with significantly less fat and fuss? Enter the game-changer:
low fat oven fried chicken. This revolutionary approach allows you to enjoy all the indulgence without the guilt, transforming a traditionally heavy dish into a wholesome, yet utterly delectable meal.
The Quest for Crispy: Why Oven-Baked is Your New Best Friend
For years, the deep fryer was considered the only true path to genuinely crispy fried chicken. But times, and techniques, have evolved. Deep frying submerges chicken in vats of hot oil, resulting in a crispy exterior but also a significant absorption of unhealthy fats and calories. The cleanup is a chore, and the lingering smell can pervade your home for hours. Many health-conscious individuals, or simply those seeking convenience, often forego this beloved dish altogether.
This is where
low fat oven fried chicken steps in as the ultimate culinary hero. By harnessing the power of your oven, you can replicate the desired texture and taste, while dramatically reducing the fat content. Imagine a golden-brown crust, crackling with every bite, revealing perfectly cooked, moist chicken underneath – all achieved with a mere tablespoon of oil, or even none at all! This method doesn't just cut calories; it streamlines the cooking process, minimizes mess, and transforms a heavy meal into one you can genuinely feel good about serving your family. It's about enjoying the classic comfort of "fried" chicken, redefined for a healthier, modern lifestyle.
Unlocking the Crispy Coating: Ingredients & Techniques
The magic of genuinely crispy
low fat oven fried chicken lies in its meticulously crafted coating and the preparation methods. It's more than just slapping some flour on chicken; it's a science of layering flavors and textures.
The Foundation: Breading and Seasoning
For the ultimate crisp, start with the right breadcrumbs. While plain breadcrumbs work, consider Panko breadcrumbs for an unrivaled airy crunch that stands up beautifully to baking. The seasoning is where you infuse personality into your chicken. A classic blend often includes:
*
Dried Oregano: Earthy and aromatic.
*
Garlic Powder: A foundational savory note.
*
Smoked Paprika: Adds color and a subtle smoky depth.
*
Grated Parmesan Cheese: Contributes umami and aids in browning.
*
Salt and Black Pepper: Essential flavor enhancers.
Don't hesitate to experiment! A pinch of chili powder can add a subtle kick, onion powder can deepen the savory profile, or a touch of dried thyme can introduce a fragrant, herbal note. For convenience, pre-seasoned breadcrumbs are an option, but mixing your own gives you complete control over the flavor profile and ensures no unwanted additives.
The Essential Wet Barrier: Buttermilk and Egg
The wet dredge is crucial for both adhesion and tenderness. Buttermilk is a traditional choice for a reason: its mild acidity helps tenderize the chicken while providing the perfect tacky surface for the dry coating to cling to. It also imparts a subtle tang that complements the savory breading beautifully. Many recipes also incorporate an egg white. The protein in the egg white helps create a lighter, crisper crust compared to using a whole egg, which can sometimes result in a tougher coating.
If buttermilk isn't readily available, you can create a decent substitute by adding a tablespoon of lemon juice or white vinegar to regular milk and letting it sit for 5-10 minutes until it slightly curdles. For those seeking even lower fat alternatives, Greek yogurt thinned slightly with water can also provide a good base. This stage is vital for the eventual crispness and flavor, acting as the delicious glue for your coating. For more detailed insights into healthy and delicious preparation, check out our article on
Low-Fat Oven Fried Chicken: Healthy, Crispy & Delicious.
The Secondary Dry Dredge: Flour and Baking Powder
Beyond the breadcrumbs, many recipes for truly crunchy
low fat oven fried chicken involve a preliminary flour dredge, often seasoned further. This double-layer approach ensures maximum crispness. A common blend includes all-purpose flour (whole wheat flour can be used for added fiber, though it may alter the texture slightly), salt, garlic powder, and importantly,
baking powder. The baking powder is a secret weapon; it reacts with the moisture and heat to create tiny air pockets, resulting in an even lighter and crunchier texture – reminiscent of the delicate crisp of deep-fried chicken.
The Secret to Sizzling Success: Mastering Oven "Frying"
Achieving that glorious, deep-fried crispness in the oven isn't just about the coating; it's about mastering a few key techniques that mimic the intense heat of a deep fryer.
Preheating is Paramount: The Hot Pan Trick
This is arguably the most critical secret to truly crispy
low fat oven fried chicken with minimal oil. The trick is to preheat your baking sheet – and a small amount of oil, if using any (even just a tablespoon!) – in the oven *before* adding the chicken. Set your oven to a high temperature, typically 450°F (230°C). Place a sturdy metal baking sheet (preferably rimmed) in the oven as it preheats. If you're using oil, carefully add it to the hot pan and let it heat up for a few minutes.
The science behind this is fascinating: when the coated chicken hits that scorching hot pan, it experiences "thermal shock." This sudden, intense heat instantly starts to crisp the coating, preventing it from steaming and becoming soggy. It creates a searing effect that locks in juices and initiates the formation of that coveted crunchy crust, much like deep frying. It's crucial to use a metal pan or baking sheet for this method; glass or ceramic can shatter due due to thermal shock when cold chicken is placed on a very hot surface. For an in-depth look at this game-changing technique, read our article on
Get Crispy Oven Fried Chicken: The Minimal Oil Secret.
The Double-Dip Method & Messy Hands Mastery
Once your coating mixtures are ready, it's time for the "double-dip" – or rather, the wet-to-dry-to-rack process.
1.
Wet Dip: Remove chicken pieces, one at a time, from the buttermilk-egg mixture, allowing excess liquid to drip off.
2.
Dry Dredge: Place the chicken piece into your seasoned flour/breadcrumb mixture. For best results, use a large plastic bag or an oblong pan for the dry ingredients. Shake gently or roll the chicken to ensure every inch is thoroughly coated. Shake off any excess coating – too much can lead to a crumbly crust.
3.
Placement: Immediately transfer the coated chicken to a wire rack that has been placed on the preheated, foil-lined baking sheet. Ensure the wire rack has been sprayed with cooking spray to prevent sticking. The wire rack is vital because it allows air to circulate completely around each piece, ensuring even cooking and crisping on all sides, preventing a soggy bottom.
This process can get messy. Your hands will likely become a gloppy mix of flour and liquid. A handy trick is to designate one hand for wet ingredients and the other for dry. Alternatively, tongs can be used, but many find their hands more efficient. To prevent the dry flour mixture from clumping, you might need to add fresh flour between batches or sift out any large clumps.
The Right Temperature & Timing
Maintaining a high oven temperature (450°F/230°C) is key to the initial crisping. Depending on the thickness of your chicken pieces, you might need to reduce the temperature slightly after the first 15-20 minutes to ensure the chicken cooks through without burning the crust. Boneless, skinless chicken breasts will cook faster than bone-in thighs or drumsticks. Always ensure chicken reaches an internal temperature of 165°F (74°C) for food safety. The foil-lined baking sheet beneath the wire rack will catch any drips, making cleanup much easier.
Tips for a Perfect Batch Every Time
Creating fantastic
low fat oven fried chicken is a rewarding culinary endeavor. Here are some extra tips to ensure your chicken is perfect, every single time:
*
Chicken Choice Matters: For truly low-fat results, opt for skinless, boneless chicken breasts. They cook quickly and absorb less fat. If you prefer the flavor of dark meat, skinless thighs are a great alternative; just be prepared for a slightly longer cooking time. Always pat your chicken pieces thoroughly dry before dipping them in the wet mixture – this helps the coating adhere better and promotes crispiness.
*
Don't Be Shy with Flavor Boosters: While the basic seasoning blend is delicious, feel free to customize. Add a dash of cayenne pepper to your dry mix for a spicy kick, or incorporate a teaspoon of your favorite dried herbs like rosemary or sage. A splash of hot sauce directly into the buttermilk can also add a subtle heat and depth of flavor. Marinating the chicken in the buttermilk mixture for a few hours, or even overnight, will yield exceptionally tender and flavorful results.
*
Batch Cooking and Reheating: If you're making a large batch, avoid overcrowding the baking sheet. Give each piece space to breathe for optimal crisping. Leftover oven-fried chicken is delicious! Store it in an airtight container in the refrigerator for up to 3-4 days. To reheat, avoid the microwave, which will make it soggy. Instead, pop it back into a preheated oven (around 350°F/175°C) for 10-15 minutes until warmed through and crispy again. An air fryer also works wonders for reheating!
*
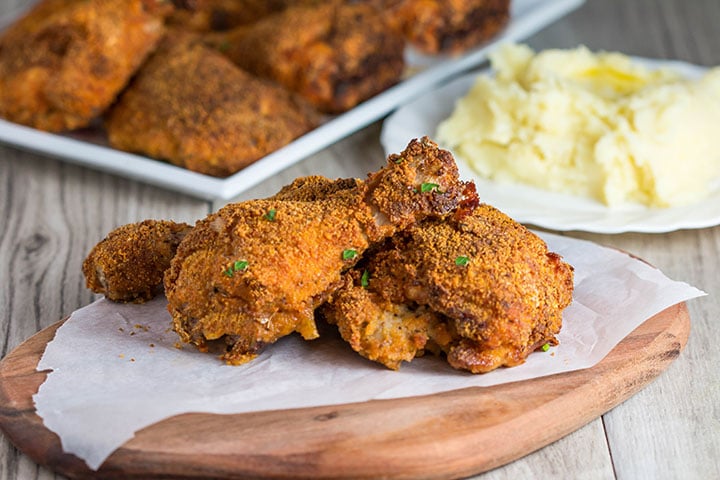
The Perfect Companions: What's a fantastic chicken dish without equally delightful sides? Embrace the healthy theme with Crispy Roast Potatoes and Garlic & Parmesan Roasted Brussels Sprouts, as suggested by the original recipes. Other excellent pairings include a fresh coleslaw, steamed green beans with a touch of lemon, or classic corn on the cob. These sides complement the chicken without adding unnecessary heaviness.
*
Embrace Customization: Think of this recipe as a canvas. Adjust the seasonings to your family's preferences. Love herbs? Add more! Crave heat? Sprinkle in extra chili flakes. This versatility is what makes homemade cooking so satisfying.
Conclusion
Say goodbye to the greasy guilt and hello to truly satisfying, healthy comfort food. Learning how to make
low fat oven fried chicken is a culinary revelation, allowing you to enjoy all the crunchy, flavorful goodness of your favorite dish without the drawbacks of deep frying. With a few smart techniques – like preheating your pan, mastering the double-dip, and using a wire rack – you can achieve astonishingly crispy results that will rival any deep-fried version. So, ditch the deep fryer, embrace your oven, and prepare to delight your taste buds with a guilt-free, delicious meal that's both easy to make and a joy to eat. Try this recipe today and rediscover your love for crispy chicken, the healthy way!